Chapter 11. Tricks and Hacks
In the current chapter, we are going to see some tricks, hacks, and techniques, which will make our work with C# easier in the IntelliJ IDEA. In particular, we will see:
- How to properly format our code
- Conventions for naming elements in the code
- Some keyboard shortcuts
- Some code snippets
- Techniques to debug our code
Code Formatting
The right formatting of our code will make it easier to read and understand in case someone else needs to work with it. This is important because in practice we will need to work in a team with other people and it is highly important to write our code in a way that our colleagues can quickly understand it.
There are some defined rules for correct formatting of the code, which are collected in one place and are called conventions. The conventions are a group of rules, generally accepted by the programmers using a given language, which are massively used. These conventions help to build norms in given languages – what is the best way to write and what are good practices. It is accepted that if a programmer follows them then his code is easy to read and understand.
The Java language is developed by Sun Microsystems (a tech company, later acquired by Oracle). Sun is the one that lays the foundations of the current well-established conventions in Java. You should know that even if you don't follow the conventions given by Microsoft, your code will work (as long as it is properly written), but it will not be easy to understand. This, of course, is not fatal at a base level, but the faster you get used to writing quality code the better.
The Official Java Code Conventions
The most widely adopted modern Java convention is called Google Java Style Guide and this book will be closely following it.
For code formatting in the Java ecosystem, the following is recommended for the curly brackets {} - the opening bracket is supposed to be on the same line and the closing bracket should be right underneath the construct:
if (someCondition) {
    System.out.println("Inside the if statement");
}
You can see that the command System.out.println(…) in the example is indented by 4 white spaces (one tab), which is a standard in Java. If the given block enclosed in curly brackets is indented by any number of tabs, then the closing curly bracket } must be right below the beginning of the construct, as in the example below:
if (someCondition) {
   if (anotherCondition) {
       System.out.println("Inside the if statement");
   }
}
Below you can see an example for badly formatted code according to the accepted conventions for writing code in Java:
if(someCondition)
{
System.out.println("Inside the if statement");}
The first thing that we see is the curly brackets {}. The first (opening) bracket should be just after the if condition, and the second (closing) bracket – below the command System.out.println(…), at a new and empty line. In addition, the command inside the if construction should be offset by 4 white spaces (one tab). Just after the keyword if, before the condition and preceding the { you should put a space.
The same rule applies for the for loops and all other constructions with curly brackets {}. Here are some more examples:
Correct formatting:
for (int i = 0; i < 5; i++) {
    System.out.println(i);
}
Wrong formatting:
for(int i=0;i<5;i++)
{
System.out.println(i);
}
Code Formatting Shortcuts in IntelliJ IDEA
For your comfort, there are keyboard shortcuts in IntelliJ IDEA, which we will explain later in this chapter, but for now, we are interested in two specific combinations. One of the combinations is for formatting the code in the whole document, and the other one – is for formatting a part of the code. If we want to format the whole code we need to press [CTRL + ALT + L]. In case we need to format only a part of the code, we need to mark this part with the mouse and press [Ctrl + Shift + Alt + L].
Let's use the wrongly formatted example from earlier:
for(int i=0;i<5;i++)
{
System.out.println(i);
}
If we press [CTRL + ALT + L], which is the combination to format the whole document, we will have a code, formatted according to the accepted conventions for Java, which will look as follows:
for (int i = 0; i < 5; i++) {
    System.out.println(i);
}
This key combination in IntelliJ IDEA can help us if we work with a badly formatted code.
Naming Code Elements
In this section, we will focus on the accepted conventions for naming projects, files, and variables, defined by Microsoft.
Naming Projects and Files
It is recommended to use a descriptive name for naming projects and files, which suggests the role of the respective file / project, and at the same time, the PascalCase convention is also recommended. This is a convention for naming elements, in which each word, including the first one, starts with an uppercase character, for example ExpressionCalculator.
Example: This course starts with the First Steps in Coding lecture, therefore an exemplary name for the solution for this lecture can be FirstStepsInCoding. The same convention applies to the files in a project. If we take for example the first problem in the First steps in Coding lecture, it is called Hello World, therefore our file in the project will be called HelloWorld.
Naming Variables
In programming variables keep data, and for the code to be more understandable, the name of a variable should suggest its purpose. Here are some recommendations for naming variables:
- The name should be short and descriptive and explain what the variable serves for.
- The name should only contain the letters a-z, A-Z, the numbers 0-9, and the symbols '$' and '_'.
- It is accepted in Java for the variables to always begin with a lowercase letter and to contain lowercase letters, and each next word in them should start with an uppercase letter (this naming is also known as
camelCaseconvention). - You should be careful about uppercase and lowercase letters because Java distinguishes them. For example,
ageandAgeare different variables. - The names of the variables cannot coincide with keywords in the Java language, for example
intis an invalid name for a variable.
Although using the symbol _ in the names of variables is allowed, in Java it is not recommended and is considered a bad style of naming. |
Naming – Examples
Here are some examples for well-named variables:
firstNameagestartIndexlastNegativeNumberIndex
Here are some examples for badly named variables, even though the names are correct according to the Java compiler:
_firstName(starts with '_')last_name(contains '_')AGE(written in uppercase, which is a badly named variable but well-named constant)Start_Index(starts with an uppercase letter and contains '_')lastNegativeNumber_Index(contains '_')
At first look, all these rules can seem meaningless and unnecessary, but with time passed and experience gaining you will see the need for conventions for writing quality code to be able to work more easily and faster in a team. You will understand that the work with a code, which is written without complying with any rules for code quality, is annoying.
Shortcuts in IntelliJ IDEA
In the previous section, we mentioned two of the combinations that are used for formatting code. One of them [Ctrl + Alt + L] is used for formatting the whole code in a file, and the second one [Ctrl + Shift + Alt + L] serves if we want to format just a piece of the code. These combinations are called shortcuts and now we will give more thorough information about them.
Shortcuts are combinations that give us the possibility to do some things in an easier and faster way, and each IDE has its shortcuts, even though most of them are recurring. Now we will look at some of the shortcuts in IntelliJ IDEA:
| Combination | Action |
|---|---|
| [CTRL + F] | Opens the search window, by which we can search in our code. |
| [CTRL + /] | Comments part of the code. / Uncomments a code, which is already commented. |
| [CTRL + Z] | Brings back one change (so-called Undo). |
| [Ctrl + Shift + Z] | The combination is opposite of [CTRL + Z] (the so-called Redo). |
| [CTRL + ALT + L] | Formats the code according the default conventions. |
| [CTRL + Backspace] | Deletes the word to the left of the cursor. |
| [CTRL + Del] | Deletes the word to the right of the cursor. |
| [CTRL + Shift + S] | Saves all files in the project. |
| [CTRL + S] | Saves the current file. |
| [CTRL + D] | Copies the current line or the selected fragment. |
| [CTRL + Y] | Deletes the current line. |
More about the shortcuts in IntelliJ IDEA* can be found here: https://www.jetbrains.com/help/idea/keyboard-shortcuts-by-category.html.
Code Snippets in IntelliJ IDEA
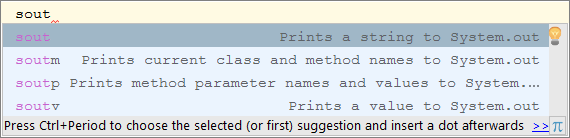
In IntelliJ IDEA there are the so-called code snippets, which write a block of code by using a code template. For example, by writing the shortcode sout + [Enter] the following code is generated in the body of our program, in the place of the shortcode:
System.out.println();
This is called “unfolding a code snippet”. The fori + [Enter] snippet works in the same way. On the figure below you can see the sout snippet in action:
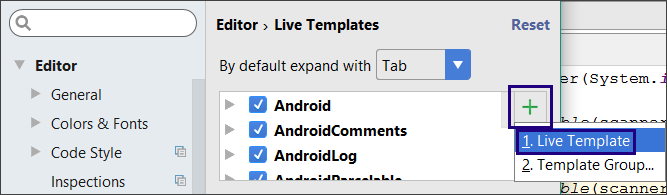
Creating Your Code Snippet
In this section, we are going to show you how to make your code snippet. We will see how to make a code snippet for the scanner.nextLine(); command. To begin we must create a new empty project in IntelliJ IDEA and go to [File → Settings → Editor → Live Templates], and choose [+ → Live Template] as shown on the picture:
A new window that looks like the one on the image below pops up:
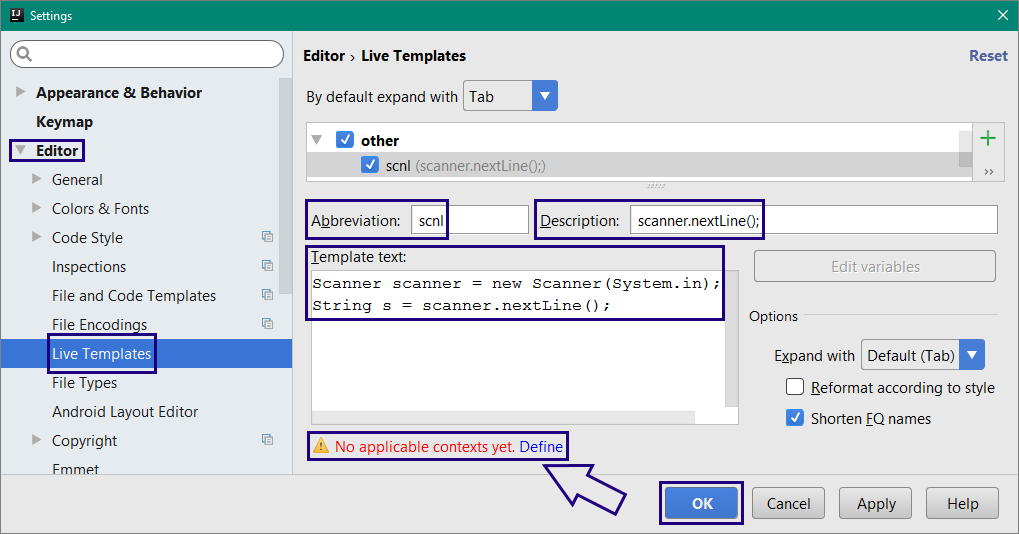
The following information should be entered:
- [Abbreviation] - we specify the code snippet that we wish to use. In our case this is
scnl. - [Description] - this is the place for our snippet's description. In our case this is
scanner.nextLine(). - [Template text] - we enter the code to be generated in the event of snippet usage. In our case this is:
Scanner scanner = new scanner(Sysrtem.in);
String s = scanner.nextLine();
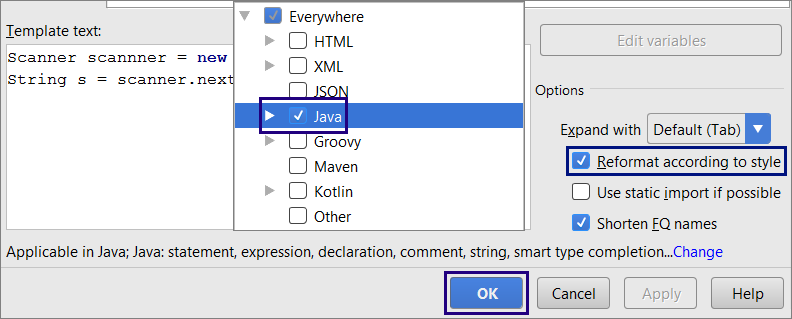
Next we select [Reformat according to style] and choose [Java] from [Define] list. To finish the procedure press [OK] as it's shown in the picture below:
Now when we write scnl in IntelliJ IDEA, our new snippet is going to appear:

Code Debugging Techniques
Debugging plays an important role in the process of creating software, which allows us to follow the implementation of our program step by step. With this technique, we can follow the values of the local variables, because they are changing during the execution of the program, and to remove possible errors (bugs). The process of debugging includes:
- Finding the problems (bugs).
- Locating the code, which causes the problems.
- Correcting the code, which causes the problems, so that the program works correctly.
- Testing to make sure that the program works correctly after the corrections we have made.
Debugging in IntelliJ IDEA
IntelliJ IDEA gives us a built-in debugger, thanks to which we can place breakpoints at places we have chosen. When it reaches a breakpoint, the program stops running and allows step-by-step running of the remaining lines. Debugging allows us to get into the details of the program and see where exactly the errors occur and what is the reason for this.
To demonstrate how to use the debugger we will use the following program:
public static void main(String[] args) {
    for (int i = 0; i < 100; i++) {
        System.out.println(i);
    }
}
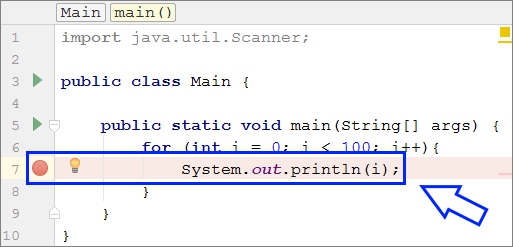
We will place a breakpoint at the function System.out.println(…). For this, we will need to move our cursor to the line, which prints on the console, and press [Ctrl + F8], alternatively we can simply click using the left mouse button on the right side of the line number. A breakpoint appears, showing where the program will stop running:
Starting The Program in Debug Mode
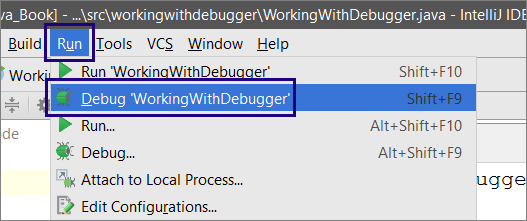
To start the program in debug mode, we choose [Run] -> [Debug <class name>] or press [SHIFT + F9]:
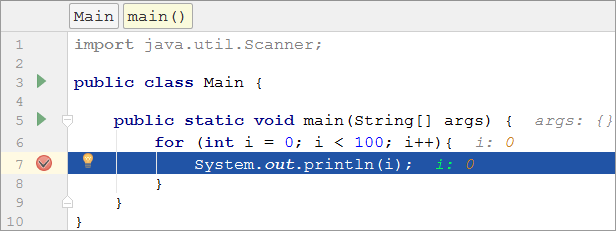
After starting the program, we can see that it stops executing at line 8, where we placed our breakpoint. The code in the current line is colored in additional color and we can run it step by step. To go to the next line, we use the key [F8]. We can see that the code on the current line hasn't been executed yet. It will execute when we go ahead with debugging the next line. The current value of the variable is depicted in green, in this case, i = 0 can be seen in the following picture.
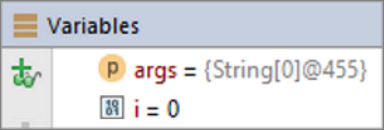
From the [Variables] window we can observe the changes in the local variables.
Tricks for Java Developers
In this section, we will recall some tricks and techniques in programming with Java, already seen in this book, which can be very useful if you attend an exam for beginner programming.
Formatted Output with printf()
For printing long and complex sequences of elements, we can use the printf(…) method. This method is an abbreviation of "Print Formatted". The main idea of printf(…) is to take a special string formatted with special formatting symbols and a comma-separated list of values that have to substitute the formatting specifiers.
printf(<formatted string>, <param1>, <param2>, <param3>, …)
Example:
String str = "some text";
System.out.printf("%s", str);
// This will print on the console "some text"
The first argument of the printf(…) method is the formatting string. In this case %s means that %s is going to be substituted by the string str and the value of str is what you'll see printed on the console.
String str1 = "some text";
int number = 5;
String str2 = "some more text";
System.out.printf("%s %d %s \n", str1, number, str2);
// This will print on the console "some text 5 some more text"
Notice that in this example we can pass non-exclusively string variables. The first argument is a formatting string. Following it comes to a sequence of arguments that are replacing any instance of a formatting specifier (meaning % followed by a single character, e.g. %s or %d). The first %s means that the first argument that is passed after the formatting string, is going to take its place, in our case that's str1. After that, there's %d which means that it's going to be substituted by the first integer number that is among the arguments. The last special symbol is %s which means that it'll be replaced by the next string that can be found in the arguments. Finally, there's \n and that is a special symbol that denotes a new line. A single variable can be used multiple times.
String str = "some text";
int number = 5;
System.out.printf("%s %d %s \n", str, number, str);
// This will print on the console "some text 5 some text"
Rounding of Floating-Point Numbers
Real numbers are represented in Java with the types float and double.
double number = 5.432432;
System.out.println(Math.round(number));
// This will print on the console "5"
If the digit at the first decimal place is less than 5, just like in the example above, then the number is rounded down, otherwise - it's rounded up as you can see in the example below:
double number = 5.543;
System.out.println(Math.round(number));
// This will print on the console "6"
Other Rounding Methods
In case we always want to round down instead of Math.round(…) we can use another method – Math.floor(…), which always rounds down. For example, if we have the number 5.99 and we use Math.floor(5.99), we will get the number 5.0*.
We can also do the exact opposite – to always round up using the method Math.ceil(…). Again, if we have for example 5.11 and we use Math.ceil(5.11), we will get 6.0. Here are some examples:
double numberToFloor = 5.99;
System.out.println(Math.floor(numberToFloor));
// This will print on the console 5.0

double numberToCeiling = 5.11;
System.out.println(Math.ceil(numberToCeiling));
// This will print on the console 6.0
Formatting with 2 Digits After The Decimal Point
When we print numbers, we often need to round them to 2 digits after the decimal point, e.g.
double number = 5.432432;
System.out.printf("%.2f%n", number);
// This will print on the console 5.43
In the given example a formatting string %.2f is used, which rounds the number variable to two decimal places. We have to take into account that the number before the letter f means the number of decimal places up to which the result will be rounded (e.g. the formatting string can very well be %.3f or %.5f). When formatting a string using printf(), it's recommended to use %n as a symbol for new line and not /n.
How to Write a Conditional Statement?
The conditional if construction contains the following elements:
- Keyword
if - A Boolean expression (condition)
- Body of the conditional construction
- Optional:
elseclause
if (condition) {
    // body
} else (condition) {
    // body
}
To make it easier we can use a code snippet for an if construction:
if+ [Enter]
How to Write a for Loop?
For a for loop we need a couple of things:
- Initializing block, in which the counter variable is declared (
int i) and its initial value is set - Condition for repetition (
i <= 10) - Loop variable (counter) updating statement (
i++) - Body of the loop, holding statements
for (int i = 0; i <= 10; i++) {
    // body
}
It's important to know that the three elements of the for loop are optional and can be omitted. for(; ; ) { … } is a valid for loop statement.
To make it easier we can use a code snippet for a for loop:
fori+ [Enter]
What Have We Learned from This Chapter?
In this chapter, we have learned how to correctly format and name the elements of our code, some shortcuts in IntelliJ IDEA, some code snippets, and we analyzed how to debug the code.